There is funny little usb gadget called the Blync identified by VID: 0x1130, PID: 0x0001.
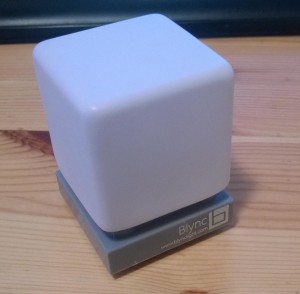
It's a glowing RGB cube, but it has two defects for me:
- the driver is only available for Windows
- only 7 colors are available
Let's fix it.
Software hack
That's the easy part.
- Plug your Blync under Windows running in a virtual machine.
- Start Wireshark under the Linux host
- Dump USB packets
- Think
- Replay packets in Python
And Voilà: https://github.com/ticapix/blynux
Hardware hack
That is already funnier.
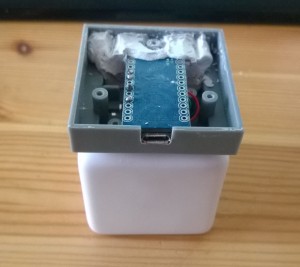
First, unscrew and remove the white top.

You will notice 5 RGB LEDs.
The LEDs look like this one PLCC6 SMD, LED SMP6-RGB. The Polarity ID or Cathode mark is in the bottom left corner, so lower pins are the ground. They even put labels to ease the identification 🙂 LR, LG, LB for, respectively, the Red, Green, Blue pins.
Take a Leonardo Pro Micro (! check that the boot loader is already installed !)

The Leonardo Pro Micro is a 5V board, but the LEDs need 2.1V for the Red and 3.3V for the Green and Blue so we need to add 3 resistors of value 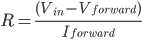 and keep in mind that
  is multiplied by 5.
In fact, the pins on the board can safely output only 40mA, which is less than the needed amount of 5*20mA=100mA. The proper solution would be to use a MOFSET like the IRF530.
I selected a resistor around 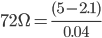 for red and
 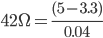 for green and blue.
Once this is done, solder the wires to the resistors to the PWM enable pins of the Leonardo. I choose pins 3, 5, 6.
Upload some code via the Arduino IDE and plug it in a USB port. The cube should glow in this order: Red  Yellow Green Cyan Blue Magenta Red.
const char steps[6][3] = {
  {
    0, 1, 0        }
  ,  // start from red  (255, 0, 0) and go to yellow  (255, 255, 0)
  {
    -1, 0, 0        }
  ,  // go to green  (0, 255, 0)
  {
    0, 0, 1        }
  ,  // go to  cyan  (0, 255, 255)
  {
    0, -1, 0        }
  ,  // go to blue  (0, 0, 255)
  {
    1, 0, 0        }
  ,  //  go to magenta  (255, 0, 255)
  {
    0, 0, -1        }
  ,  // go back to red (255, 0, 0)
};

int rpin = 6;
int gpin = 5;
int bpin = 3;

int pot_pin = 0;

void setup()                    // run once, when the sketch starts
{
  pinMode(rpin, OUTPUT);   // sets the pin as output
  pinMode(gpin, OUTPUT);   // sets the pin as output
  pinMode(bpin, OUTPUT);   // sets the pin as output
}

void loop()                     // run over and over again
{
  unsigned char color[3] = {
    255, 0, 0    }; // start by red
  for (int c = 0; c < 6; ++c) { // go through the 6 colors
    for (int i = 0; i < 255; ++i) {
      color[0] += steps[c][0];
      color[1] += steps[c][1];
      color[2] += steps[c][2];
      analogWrite(rpin, color[0]);
      analogWrite(gpin, color[1]);
      analogWrite(bpin, color[2]);
      delay(30);
    }
  }
}
One thought on “Blync”
Comments are closed.